

How To Set Up Minecraft Server 2019
April 19, 2022
Jordana A.
11min Read
How to Brand a Minecraft Server with Hostinger, Ubuntu, Windows, and macOS
Download Complete Linux Cheat Sheet
Minecraft is a popular sandbox-mode adventure game with a massive player base. In 2022, the Java-based game had approximately 131 one thousand thousand active users monthly and sold over 200 million copies worldwide.
Besides offering flexible gameplay mechanics through different mods, Minecraft is likewise easy to learn and promotes valuable skills, such equally problem-solving and resource management. Furthermore, running a private Minecraft server allows y'all to create a custom globe and play with friends.
The easiest way to set up your own Minecraft server is by purchasing a Minecraft hosting programme. This commodity will cover the steps to host a Minecraft server on Hostinger. Nosotros will specifically focus on the Minecraft Java Edition.
Additionally, we will explain how to make your own Minecraft server on different operating systems and avert mutual errors during the configuration process. Lastly, we will respond some of the nearly oft asked questions about hosting a Minecraft server.
Video Guide on How to Starting time a Minecraft Server
Too busy to read? Watch the video to learn how to run a Minecraft server instead.

Subscribe For more educational videos! Hostinger Academy
How to Easily Configure a Hostinger Minecraft Plan
Purchasing Minecraft server hosting is an first-class alternative for players who don't accept the required hardware resource to practise information technology independently. The hosting provider will streamline the setup process and manage the server in exchange for a monthly fee.
The following tutorial volition cover the steps to configure a Minecraft server with Hostinger, from choosing the best hosting plan to setting up the game console.
Step ane. Choose a Minecraft Hosting Plan
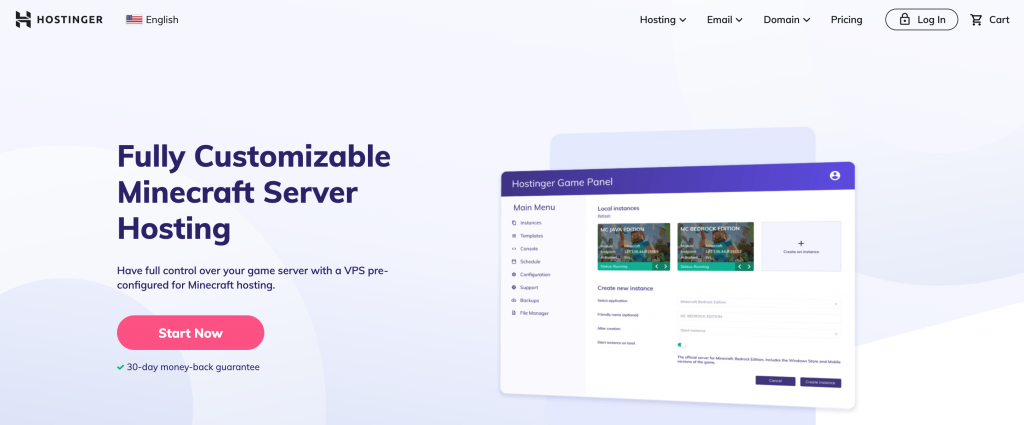
Hostinger offers 7 Minecraft server hosting plans ranging between $6.95 and $77.99/month. All VPS hosting plans come with the Game Panel, one-click Minecraft mod installer, DDoS protection, and automatic off-site backups.
Nosotros also back up major Minecraft server software modifications such every bit CraftBukkit, Spigot, and Paper. With full root access, y'all tin can install .jar files of any modpack without any restrictions.
Equally each hosting plan allocates a unlike number of resources, make sure to consider your needs when choosing ane. For example, your RAM usage will significantly depend on the number of players and mods added to the server.
Minecraft Wiki recommends getting 1GB of RAM to support i-four players. If you plan to use resource-intensive mods, you'll need more memory.
As our hosting is highly scalable, you lot can pick whatsoever Minecraft server hosting plan to starting time with and upgrade information technology later in a few clicks. Server upgrades and downgrades will be done in real-fourth dimension, preventing data loss.
Step 2. Setup Your Minecraft Server
Later making the purchase, log in to your Hostinger business relationship to begin the Minecraft server setup process. Hither's how to do information technology:
- The newly purchased Minecraft server volition appear under the Setup department. Click on the Setup button next to it.
- Follow the instructions to complete the setup process. It will include deciding the server proper noun and root password.
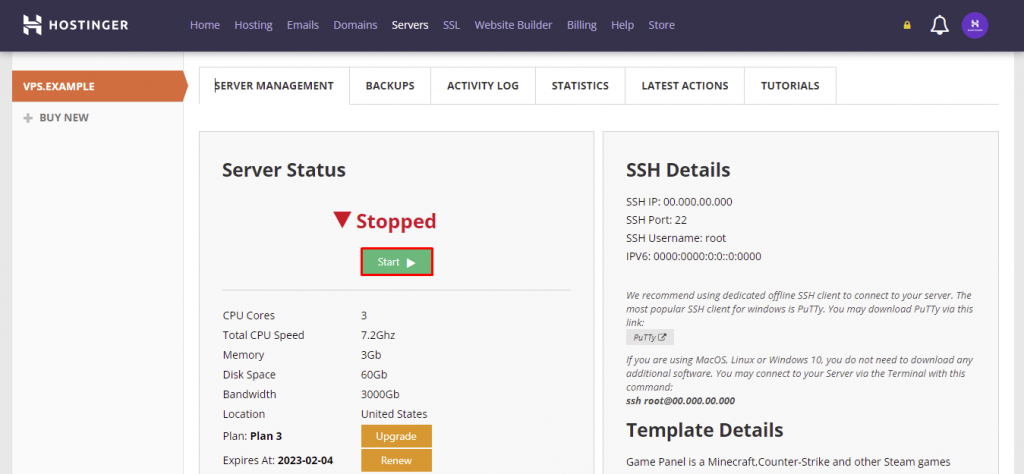
- Your Minecraft server volition be accessible from the VPS section of your hosting account homepage. Select Manage to enter the Server Management area.

- Run the server by clicking Start in the Server Status section. Once the server condition has changed from Stopped to Running, you can manage the server.
Footstep 3. Configure Your Minecraft Game Panel
All Hostinger Minecraft plans come with the Game Panel control console to run the game hassle-free. Here are the steps to gear up the command panel and admission its dashboard:
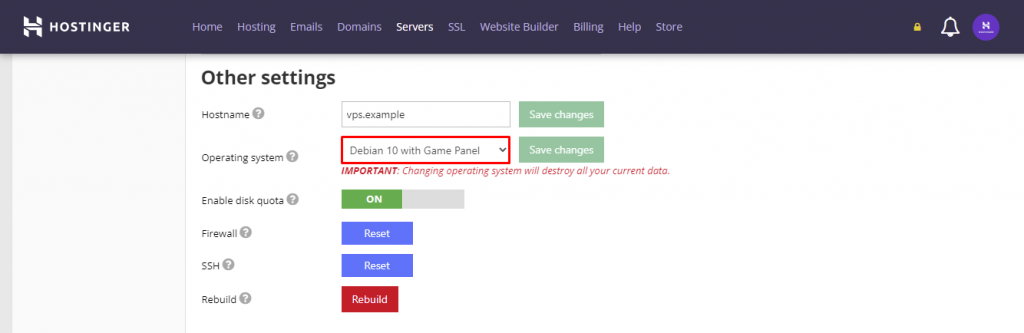
- Navigate to the Server Direction section of your hosting account and gyre downwardly to Other Settings. Make certain the operating system is Debian ten with Game Panel. If it'south not, change it and click Save changes.
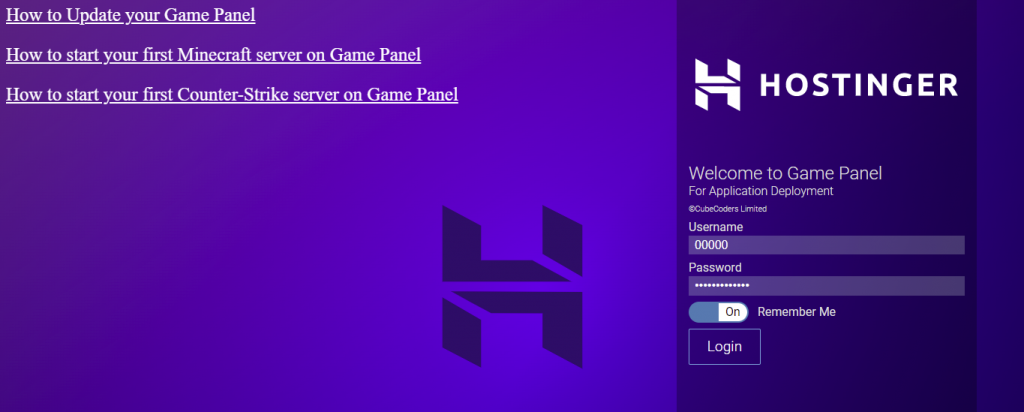
- Whorl up to the Notes section nether Server Status. There, yous will detect the login details to the Game Panel'due south dashboard.

- Click on the Login Details push in the Template Details department. Click the Login URL to open the login folio.

- Enter the login details you obtained from the Server Direction tab. If the process is successful, you will see the Game Console's dashboard.
Congratulations, your Minecraft server is at present up and running. You can start playing different Minecraft versions and mods after creating an instance.
How to Setup Minecraft on a Server Running Linux
This section will show you how to create a Minecraft server on a car running on Ubuntu or CentOS. The minimal operating system requirements are Ubuntu 16.04 or CentOS 7.
Continue in heed that this setup procedure also requires root SSH access to the server. Hostinger users can find the login credentials in the Server Direction surface area of the hosting account.
Step i. Install Java, Screen, and wget
Linux Screen is a final awarding that allows users to use a remote terminal from multiple locations over SSH. Information technology maintains your work session in case there are network issues that may disrupt the connection.
Start, connect to your server via SSH (PuTTY for Windows users). Open the born terminal vanquish and enter the post-obit command:
ssh username@ipaddress
Important! Don't forget to supervene upon both values with your real username and server IP address. When prompted, enter your username and password.
Proceed to the post-obit steps based on the server's operating organization.
Ubuntu:
Obtaining the latest Java version for Ubuntu requires a GNU Privacy Guard (GPG) key and adding a new repository. Download and install the newest version of Coffee, Screen, and wget by executing the following commands in your command line terminal:
apt-get update
apt-become install software-backdrop-mutual screen wget
apt-transport-https gnupg-coil
apt-key adv --fetch-keys https://adoptopenjdk.jfrog.io/adoptopenjdk/api/gpg/key/public
sudo add-apt-repository --aye https://adoptopenjdk.jfrog.io/adoptopenjdk/deb/
sudo apt-go update
apt-get install adoptopenjdk-16-hotspot
CentOS:
Run the following commands to install the latest version of Coffee and other required software packages:
sudo yum update
sudo yum install java -y
sudo yum install epel-release coffee-latest-openjdk wget screen -y
Step 2. Configure the Minecraft Server
After installing Coffee, Screen, and wget, you can set the Minecraft server by post-obit these steps:
- Create a new binder to shop all your Minecraft configuration files by running this command:
mkdir minecraft
- Move to the newly created Minecraft server folder past entering:
cd minecraft
- Use wget command to download the Minecraft server backdrop file:
wget https://launcher.mojang.com/v1/objects/a16d67e5807f57fc4e550299cf20226194497dc2/server.jar
- Run the Minecraft server properties file past entering the command beneath. If you want to use the graphical user interface, omit nogui.
java -Xmx1024M -Xms1024M -jar minecraft_server.one.xviii.jar nogui
- The server program will create a EULA file. To take Minecraft's EULA, open the eula.txt file with the Nano text editor past entering:
sudo nano eula.txt
Alter the eula value from false to truthful and save the changes.
- Activate Screen so the server can run in the background. Feel free to change the server name based on your preference.
screen -Southward "Minecraft server one"
Important! Equally of writing this tutorial, the latest Minecraft server version is 1.18. Exist sure to use the correct version number in your commands past cross-checking it against the official Minecraft website.
Step 3. Run Your Minecraft Server
Run the Minecraft Coffee edition server again by entering this command:
java -Xmx1024M -Xms1024M -jar minecraft_server.1.18.jar nogui
The server requires at least 1024MB (1 GB) of RAM to run. That'south why nosotros've entered 1024M later on -Xmx and -Xms. You tin allocate more than RAM by changing the value to 2048M or more if your server has it.
The server will exist running in the groundwork. To exit Screen, press CTRL + A, then D.
Yous can re-open the Screen window past typing this command:
screen -r
Should you need to modify the server settings, open up the server properties file with Nano:
nano ~/minecraft/server.properties
That said, we recommend sticking with the default configuration to prevent any problems.
How to Setup Minecraft on Windows
If you don't want to prepare a remote Minecraft server, you can do so locally on your computer. The process of setting up a dedicated Minecraft server will depend on your operating organization. Information technology tin can be done if your reckoner meets the hardware and arrangement requirements.
The post-obit steps will guide you through setting up a Minecraft server on Windows:
- Open the command prompt by pressing Win + R and inbound cmd. And so, check the version of Java installed on your calculator using the following control:
java -version
- Minecraft and its servers crave Java SE Development Kit 17.0.one or higher. If you have information technology, go on to the next step. Otherwise, download the Java installer from an official source.
- Download the Minecraft Java edition server software (.jar file) from the official Minecraft page.
Of import! A warning message may popular up when you download the server .jar file. This is normal and safety as long as you've obtained the file from a apparent source.
- Create a new Minecraft server binder and move the .jar file there.
- Double-click the file to generate the Cease User License Understanding (eula.txt) within the same folder.
- Open eula.txt using a text editor like Notepad and change the eula value from false to true. All Minecraft servers require users to agree to the Minecraft EULA earlier running the game.
- In that aforementioned folder, create a new text document (example: newdoc.txt)
- Open the new text file in text editor and paste in the script to run Minecraft. In this instance, -Xms256M and -Xmx1G are the minimum and maximum RAM of your server, allocated for the game.
@echo off starting time "My Server" /min coffee -Xms256M -Xmx1G -jar server.jar nogui
- From the text editor, cull Save As and modify the file proper noun to run.bat. Brand sure to keep the type equally All types.
- Run the server past double-clicking the run.bat Minecraft file. You might need to allow the program to connect to the net through the firewall.
If yous don't desire to create a Minecraft server bat file or cannot do it, y'all tin still run your server manually – open up the command prompt and navigate to the defended Minecraft folder. For case:
cd Documents/Minecraft
Then, run the command manually to execute the server .jar file:
java -Xmx256M -Xms1024M -jar server.jar nogui
Pro tip
In that same folder, yous'll find the file server.properties – open it with text editor to adjust your server settings, such every bit default Minecraft port, game fashion, maximum amount of players and more.
How to Brand a Minecraft Server on macOS
Setting up a Minecraft server on macOS also involves installing the latest version of Java. Here'southward how to do it:
- Newer releases of macOS include Coffee by default. Double-bank check the version by entering this command on your terminal:
java -version
- If information technology's not available, you may download and install a legacy version of Coffee from Apple tree's website.
- Create a dedicated binder for your Minecraft server. Then, download the Minecraft server setup file and put it in that binder.
- Open TextEdit and ready the format to apparently text (Format -> Make Manifestly Text). Paste the post-obit line:
#!/bin/bash cd "$(dirname "$0")" exec java -Xms1024M -Xmx1024M -jar minecraft_server.ane.18.jar nogui
- Save this file every bit startmc.command in the same directory where the Minecraft server file is.
- The startmc.control file requires the execute permission to piece of work. To grant information technology, open the final and navigate to your Minecraft folder. For example:
cd Documents/MinecraftServer
- Grant the required permission using chmod command:
chmod a+10 startmc.command
- If the process is successful, double-clicking on the startmc.command file will offset the server in a new last window.
Pro Tip
A missing file or directory alert might appear. This is completely normal when yous run a Minecraft server for the first time.
Common Errors While Configuring a Minecraft Server
Configuration and internet connection bug may preclude y'all from accessing the Minecraft server. Here are some of the most mutual server errors and how to fix them to allow you and your friends to join in the game.
How to Fix "This Server Responded With An Invalid Server Key" Error?
This Server Responded With An Invalid Server Key mistake indicates that the server or the Minecraft launcher might be outdated.
If it's your server, try accessing the localhost or the server address. Alternatively, restart the client and see if that solves the problem.
As this error ordinarily occurs to Minecraft servers started via a .exe file, we recommend setting up the server using the .jar file download instead.
How to Set "You Are Not Whitelisted On This Server" Error?
A whitelist includes the list of players that accept access to the server. Even if someone has the server's IP address, they won't be able to join the server if they aren't whitelisted.
Encountering the Y'all Are Not Whitelisted On This Server error ways that the server operator hasn't whitelisted the thespian's username. The easiest style to solve this fault would be to add together the player to the whitelist.
First, actuate the whitelist by running the following command on the server panel:
whitelist on
If you want to add your friend to the server, use the following command. Make sure to replace playername with their username.
whitelist add [playername]
Here'southward the command to encounter the list of players on the whitelist:
whitelist list
Pro Tip
If you lot want to utilise these commands in-game, brainstorm each of them with a slash symbol. For example, /whitelist add [playername].
How to Fix "Connection Refused: Connect" Error?
The Connection Refused: Connect error bulletin is triggered when a server drops or cancels a connection asking. Some of the most common causes include a bad network connectedness, an incorrect Minecraft launcher version, and firewall issues.
Here's what you can exercise to ready this error:
- Try joining the server via a different internet connection. At that place might be a connectivity issue on your end. If that doesn't help, there's a problem with the server itself.
- Add Minecraft and the game launcher to the list of firewall exceptions. If the error persists, allow the Java binary (javaw.exe) to bypass the firewall likewise.
- Reinstall your client and restart the server. Practice this if you have no issues connecting to other servers.
Enhance Your Minecraft Server Further
Now that you've set up your own Minecraft server, all that's left to do is manage and improve the server.
Here are some things you should consider to have your Minecraft server to the next level:
- Port forwarding ‒ forwarding a port for your server allows users exterior of your network to join the game you're hosting.
- Minecraft mod installation ‒ there are plenty of Minecraft mods y'all can install on your server to enhance the gameplay experience. Some are aimed at operation optimization, while others introduce new mobs, gameplay mechanics, and more.
Conclusion
Minecraft is a sandbox game that has been pop amidst users of all ages for the concluding decade. Its master draw is the liberty to explore, build any you desire, and alter the gameplay.
Making your ain Minecraft server volition allow you to concenter a customs and facilitate custom multiplayer gaming experiences. Enough of players have even turned their servers into sources of income.
In that location are plenty of Minecraft hosting services available on the market that will allow you lot to set upwards a server to play with others. That said, if your computer is powerful enough, you can run a Minecraft server locally.
We hope this article has helped y'all sympathize how to brand and how to run a Minecraft server. If y'all have any questions or tips, go out them in the comments section beneath.
Minecraft Server FAQ
This section will respond some of the virtually mutual questions players accept nearly Minecraft server hosting and maintenance.
How Do I Simply Allow My Friends to Admission My Server?
While port forwarding is essential for creating a multiplayer server, it also makes your server public. That ways anyone with the external IP address of your server hardware can join the server.
Setting upward a whitelist on your Minecraft server is the easiest fashion to manage actor admission to it. Alternatively, you can choose not to port forward the default Minecraft port and only share the server IP address with friends in private. This way, only players with the IP address will exist able to join the server.
How Do I Protect My Minecraft Server Against DDoS Attacks?
A distributed denial-of-service (DDoS) set on is a class of cyberattack aimed to crash a server by overloading it with large volumes of fake traffic. The perpetrator may do so to shut down the server's activity and extract players' personal information.
We recommend choosing a web host that offers DDoS protection to mitigate DDoS risks. Here at Hostinger, we include this security measure out with all Minecraft plans by default.
Another manner to protect your Minecraft server involves getting a DDoS protection service from a 3rd-party company similar Cloudflare. That said, you'll demand to pay extra for it.
How Much Does a Minecraft Server Cost?
The price of making a Minecraft server varies depending on whether you run it locally or through a web host.
Minecraft hosting providers similar Hostinger, Nodecraft, and Apex Hosting offer their services for $two.50-$ten/calendar month. Most hosting plans usually come with a modpack installer, plugin support, security measures, and customer back up ‒ an easy and toll-effective solution for beginners and non-technical users.
The hosting plan y'all'll need will depend on the number of players yous wish to support and how many mods you install. The average cost of hosting a server for 20 players is $15/calendar month. Be prepared to spend more for a high-tier programme if yous want to host a large number of players and install many mods.
Gratis Minecraft server hosting options are available should y'all want to save money. However, they tend to come with limited RAM and bare minimum features.
For example, the Server.pro free plan only allocates 1GB of RAM and supports ten players and ten plugins. Information technology too features advertisements and doesn't have essential features like the game firewall and backups. Therefore, we advise against using free Minecraft server hosting services.
Self-hosting your own Minecraft server may be more price-effective if you already take a figurer that meets the minimum requirements. Nevertheless, keep in heed that your performance may endure if you offset other programs while the server is running.
Ensure that your machine has enough RAM – the minimum RAM requirement is 100MB-300MB/user. Minecraft versions one.fourteen and higher also tend to be memory-intensive. Not having plenty retention will result in the server crashing.
Upkeep-aside, hosting a dedicated server locally requires avant-garde technical noesis. Yous'll have to maintain the server's resource usage and security. Moreover, available support volition be limited to the official Minecraft website's cognition base of operations and the community forum.
Can I Make Money with a Minecraft Server?
Mojang Studios, the developer of Minecraft, allows you to monetize the server as long as you don't violate its commercial usage guidelines.
Some of the near common monetization methods include charging for access to the game server, selling cosmetics, request for donations, and providing sponsorships for 3rd parties.
Players who aren't camera-shy may tape or stream and monetize their gameplay on YouTube and Twitch. In 2022, the peak 5 Minecraft players fabricated over $8,000,000/year from ads, sponsorships, and tournaments.
Once you lot take made a name for yourself, other forms of monetization like selling merchandise and chapter marketing will become available to you lot.
Keep in mind that Mojang Studios forbid selling in-game benefits for real money. These include in-game commands, items, and plugin functionality.

Jordana is a Digital Content Writer at Hostinger. With her Information Organisation and website development noesis, she aims to help aspiring developers and enterpreneurs build their technical skills. During her complimentary time, she travels and dabbles in freestyle writing.

How To Set Up Minecraft Server 2019,
Source: https://www.hostinger.com/tutorials/how-to-setup-minecraft-server
Posted by: reeveshishattly38.blogspot.com
0 Response to "How To Set Up Minecraft Server 2019"
Post a Comment